Creating a Schema from a Hive database
A Schema can be created by importing table definitions from a Hive database . You can import multiple tables from Hive to build a Schema and then edit the tables and columns using Privitar to finalize the Schema definition.
The process of importing from Hive requires details for the Hive database, because Privitar must connect to that database to read the table definitions.
There are two ways to specify the Hive database. The choices available depend on the Privitar configuration and may not be available on all Privitar installations:
Connecting to an Environment's Hive configuration.
Connecting to a manually specified Hive database.
For more information about setting up Hive in Privitar, see Hadoop Cluster Environment Configuration.
Once a Schema has been imported, tables and columns can also be added or modified if required to finalize the Schema definition. For more information, see Adding Tables and Columns to a Schema.
Connecting to an Environment's Hive configuration
To import a Schema from an Environment's Hive configuration, follow these steps:
Select Schemas from the Navigation sidebar. The Schemas page is displayed.
Click on Create New Schema. The New Schema window is displayed.
Enter a name for the new Schema in the Name field.
Select Import from Hive from the Import tables list box. The Import from Hive window is displayed.
Select an Environment with the desired Hive configuration from the Environment list box.
If the tables that you are importing contain Date or Timestamp fields, Privitar will import these tables according to the following default Date and Timestamp formats:
Date Format:
yyyy-MM-ddTimestamp Format:
yyyy-MM-dd'T'HH:mm:ss
If you want to change this format, click on the Cog icon. Update the formats and click on OK. (For more information about the Date and Timestamp formats supported by Privitar, see Date and Timestamp formats.)
Click on Fetch Tables.
The table details are fetched from the location specified and displayed in the left-hand pane.
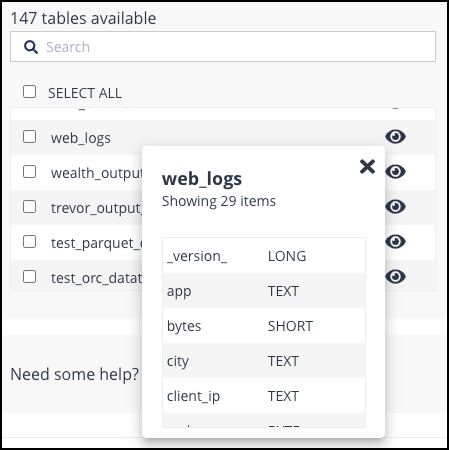
Use the Eye icon to the right of a table to inspect the contents of a table. For example:
Pick the tables to import by selecting the checkbox alongside each table. The selected table is added to the list of tables to import in the right-hand pane.
To quickly select all tables, use the Select All checkbox. You can also use Shift-click to select a number of tables.
To de-select a table from the list of tables to import, click on the Trash icon.
Click on Import tables to add the selected tables to the Schema.
The tables are imported and the New Schema window is updated with the tables that have been imported.
Click on a table in the left-hand pane to preview its definition on the right, and to make any edits to any of the columns included in the table. For more information about the editing actions and how to finalize the Schema definition, see Adding Tables and Columns to a Schema.
Click on Save to save the new Schema.
The new Schema is added to the list of Schemas on the Schemas page.
Connecting to a manually specified Hive database
To import a Schema from a manually specified Hive database, follow these steps:
Select Schemas from the Navigation sidebar. The Schemas page is displayed.
Click on Create New Schema. The New Schema window is displayed.
Enter a name for the new Schema in the Name field.
Select Import from Hive from the Import tables list box. The Import from Hive window is displayed.
Select an Environment with the desired Hive configuration from the Environment list box
Click on Specify Hive Connection... . The Connect to Hive dialog box is displayed.
Select the Cluster type you wish to use from the Hadoop Cluster Type list box.
Select the authentication method to be used by the Hive connection from the JDBC Connection Template list box.
The following table describes the options:
Method
Description
Hive Basic
Requires a connection URL, a user name and password.
Hive Knox
Requires a connection URL, a user name and password.
Hive Kerberos
Requires a connection URL, Keytab Path, Principal, Key Distribution Center (KDC) URL, and Realm.
Please contact your system administrator for information on completing these fields.
Click on OK.
The table details are fetched from the location specified and displayed in the left-hand pane.
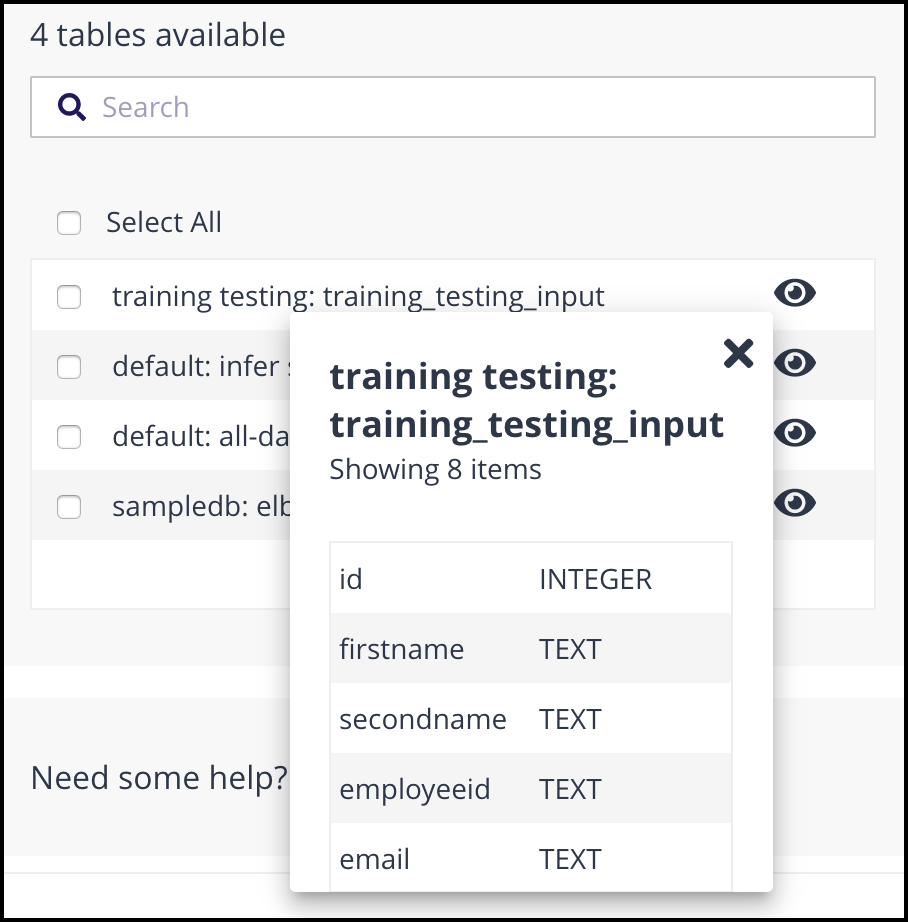
Use the Eye icon to the right of a table to inspect the contents of a table. For example:
Pick the tables to import by selecting the checkbox alongside each table. The selected table is added to the list of tables to import in the right-hand pane.
Click on Import tables to add the selected tables to the Schema.
The tables are imported and the New Schema window is updated with the tables that have been imported.
Click on a table in the left-hand pane to preview its definition on the right, and to make any edits to any of the columns included in the table. For more information about the editing actions and how to finalise the Schema definition, see Adding Tables and Columns to a Schema.
Click on Save to save the new Schema.
The new Schema is added to the list of Schemas on the Schemas page.