Table of Contents

Search

  1. Abstract
  2. Supported Versions
  3. Integrating Informatica® Big Data Management 10.2.2 HF1 SP1 with Qubole

Integrating Informatica® Big Data Management 10.2.2 HF1 SP1 with Qubole

Integrating Informatica® Big Data Management 10.2.2 HF1 SP1 with Qubole

Edit *-site.xml Cluster Configuration Values

Edit *-site.xml Cluster Configuration Values

Big Data Management uses the property-value pairs from a set of cluster configuration files on the Qubole cluster to create a cluster configuration object. The Data Integration Service uses the cluster configuration to run mappings on the cluster.
To create a cluster configuration, you must retrieve the set of cluster configuration files from the Qubole cluster and save them to the domain node.
  1. In the AWS console, browse to the list of running EC2 instances. Select the instance that hosts the Qubole master node.
  2. In the Description tab of the EC2 instance, copy the value of the IPv4 Public IP property.
    The following image shows the location of the IPv4 Public IP property:
  3. Open a shell on the Informatica domain host using Putty or a similar utility.
  4. Type the following command to open an SSH channel to the Qubole cluster master node:
    ssh ec2-user@<IPv4 address>
  5. Browse to the Hadoop configuration directory on the cluster master node:
    cd /etc/hadoop
    When you list the files in the Hadoop configuration directory, note the presence of several files named like *-site.xml. These are the Hadoop cluster configuration files.
  6. In this step and the next step, you copy files from the cluster master node to any directory on the Informatica domain node.
    Copy the following files from the cluster master node to a directory on the domain node:
    • core-site.xml
    • hdfs-site.xml
    • mapred-site.xml
    • yarn-site.xml
  7. Browse to the
    usr/lib/hive1.2/conf
    directory and copy the hive-site.xml file to the directory on the domain node where you copied the other *-site.xml files.
  8. Get the fully qualified host name of the Informatica domain node. To get this value, type the command
    hostname
    .
    The resulting value will be like
    ip-10-20-30-40.ec2.internal
    .
  9. On the Informatica domain node directory where you copied the *-site.xml files, open the
    core-site.xml
    file for editing. Make the following change:
    1. Locate the property
      fs.defaultFS
      .
    2. Change the value from:
      hdfs://${master.hostname}:9000
      to contain the fully qualified host name from the previous step.
      For example, the resulting value will be like
      hdfs://ip-10-20-30-40.ec2.internal:9000
      .
    3. Save and close the
      core-site.xml
      file.
  10. Open the
    hive-site.xml
    file for editing. Make the following change:
    1. Copy the following property entry and paste it to the file:
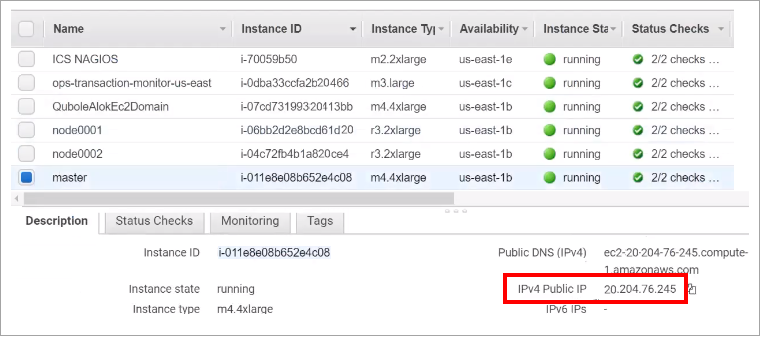
      <property> <name>hive.metastore.uris</name> <value>thrift://<fully qualified master host name>:10000</value> <description>JDBC connect string for a JDBC metastore</description> </property>
    2. Replace
      <fully qualified master host name>
      with the fully qualified host name from the previous step.
      For example, the resulting value will be like
      thrift://ip-10-20-30-40.ec2.internal:10000
      .
    3. Save and close the
      hive-site.xml
      file.
  11. Create a .zip archive containing the five *-site.xml files.
    Use this .zip archive file to create the cluster configuration on the domain.

0 COMMENTS

We’d like to hear from you!